Primer-BLAST
Primer-BLAST is NCBI’s free online primer design platform which designs PCR primers using the Primer3 system and simultaneously checks the likelihood that the primers will bind to unspecific regions of the organism’s genome via the BLAST algorithm.
Here is how to design real-time PCR primers using Primer-BLAST.
Mastering qPCR
Further video tutorials on qPCR primer design can be found in our Mastering qPCR course.
>>Use code 20QPCR to get 20% off<<
1. Head on over to the NCBI website
So, you need to head on over to the NCBI website. Specifically, the part of NCBI we are interested in is their Nucleotide section.
2. Search for your gene
Search for your gene of interest using the search bar at the top. I usually search my full gene name along with the species I am interested in. Since the NCBI database is vast, you will want to narrow down your search the best you can.
As an example, I am interested in the interleukin-6 gene in humans.
On the results pages, you can also use the sidebars to filter the search further. I usually select ‘mRNA’ as the ‘Molecular types’ and the ‘Homo sapiens’ as the ‘Organism’. Of course, these can be altered to fit your gene of interest.
3. Select your gene and variant of interest
What you want to look for is the mRNA sequence of your gene of interest. This usually has an accession number starting with a ‘NM_’. Be aware that some genes also have multiple transcripts, so make sure you select the correct mRNA sequence for the gene AND transcript you are interested in.
Some sequences also have ‘cds’ after them. Cds refers to the coding sequence for that particular gene. In other words, it corresponds to the DNA sequence that is translated into the protein product. Do not select the cds of your transcript, since we require information regarding introns (this will make sense as you read on).
Once you have found the sequence you are interested in, click on it. For our example, I will select the top option: ‘Homo sapiens interleukin 6 (IL6), transcript variant 1, mRNA’.
 4. Open up Primer-BLAST

On the sequence page you will find a wealth of information about that gene sequence, including the raw sequence towards the bottom of the page.
What we want to do is to now open Primer-BLAST to design real-time PCR primers using this sequence. To do this, select the ‘Pick Primers’ option on the right-hand sidebar that has the heading ‘Analyze this sequence’.
5. Set the criteria for the desired primers
There are multiple sections to the Primer-BLAST page, so we will consider each individually.
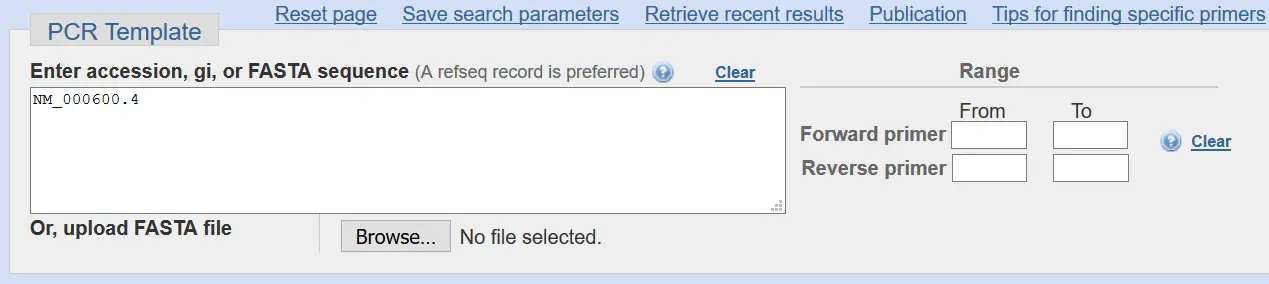
PCR Template
The first section contains the accession number. Since you have already specified a sequence to design primers for, the accession number will already be entered for you. For our example, the accession number is ‘NM_000600.4’. This is a unique code to tell Primer-BLAST to design primers based on the ‘Homo sapiens interleukin 6 (IL6), transcript variant 1, mRNA’ sequence.
You can, if you so wish, upload your own sequence through by either entering a FASTA sequence or uploading a FASTA file. Also, you can specify a range of bases to design a primer set in. But we are not going to do this.
Summary
- Leave all of this section as the default settings.
Primer Parameters
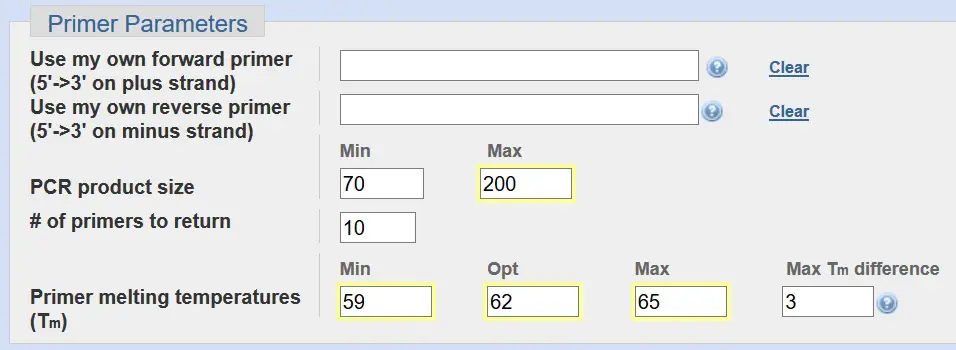
Under the primer parameters section, you can decide to input your own primer sequences. This is ideal for visualising where on the gene the primers bind to. But we will leave this blank since we do not know the primer sequences yet.
For real-time PCR, an optimal PCR product size is between 70 – 200 base pairs. So change the ‘Max’ to ‘200’.
The ‘# of primers to return’ quite simply is the number of primer pairs you want Primer-BLAST to create based on your criteria. We will just leave this at 10.
At the bottom of the Primer Parameters you can specify the range of primer melting temperatures (Tm). The default settings for this are a minimum and maximum Tm of 57oC and 63oC, respectively, with an optimal Tm of 60oC. The ‘Max Tm difference’ is the difference in Tm between the forward and reverse primers, which is currently set as 3oC.
For real-time PCR, we want to use an annealing temperature of around 60oC for our PCR reaction. Therefore, we want to increase the primer melting temperatures (Tm) to an optimum 62oC. As a very loose rule of thumb, the annealing temperature of the PCR reaction is approximately 3 – 5oC below that of Tm of your primer pair. Again, this is only an approximation. Therefore, a primer pair with a Tm of around 62oC should, in theory, have an annealing temperature of 57 – 59oC.
Summary:
- Change the ‘Max’ product size value to: 200.
- Change the ‘Primer melting temperatures (Tm)’ to: 59 (Min); 62 (Opt); 65 (Max).
Exon/Intron selection
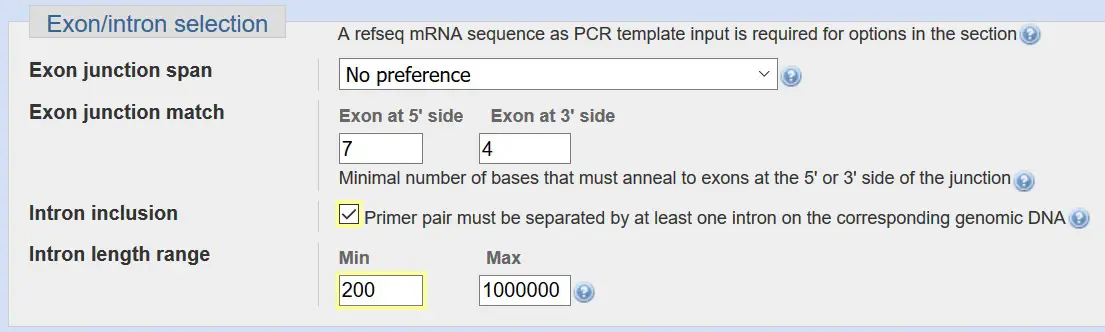
The exon/intron selection criteria concern additional design features you want your primers to have to be more specific towards mRNA while limiting the chance for genomic DNA amplification.
For ‘exon junction span’, you can ask Primer-BLAST to design a primer to bind to two exons. This would mean that part of the primer binds to one exon, while the remaining will bind to the adjacent exon. You can specify how many nucleotides of the primer to bind to each exon in the ‘exon junction match’ section. By designing a primer that spans two exons, you are being more specific towards mRNA amplification and the primer should not, in theory, amplify genomic DNA which contains introns. For personal preference, I do not decide to choose this option. But feel free to give it a go.
The final section is for intron inclusion. Specifically, it is selected if you want your primer pairs to be separated by at least one intron. By doing so, you can identify any genomic DNA contamination in your PCR reaction since genomic DNA would include the adjacent intron thus giving you a larger PCR product. Additionally, if the intron is very large, you can eliminate this amplification during PCR since the resulting product may not extend fully. So I find it useful to always select to have an ‘intron inclusion’ and I always reduce the minimum size of the intron to 200 base pairs as sometimes the introns may be smaller than the default value of 1000 base pairs.
Summary:
- Select ‘intron inclusion’.
- Change the minimum ‘intron length range’ value to 200.
- Optional: Select to have your primer to span an exon junction. If so, there is no need to select the aforementioned intron inclusion as well.
Primer pair specificity checking parameters
The last section in Primer-BLAST contains a wealth of parameters, most of which you can just leave alone. The most important part is to check that the ‘Organism’ box contains the correct name or organism number. In our example, we have ‘9606’ in the box which is the code for Homo sapiens.

Summary:
- Ensure the correct organism code/name is entered in the ‘Organism box’.
- Leave all the other settings to their default values.
6. Run Primer-BLAST
Once you are happy, click the ‘Get Primers’ button at the bottom.
Primer-BLAST will now use the criteria you have specified to design the PCR primers. This can take a good few minutes depending upon how conservative your design parameters are.
7. The output
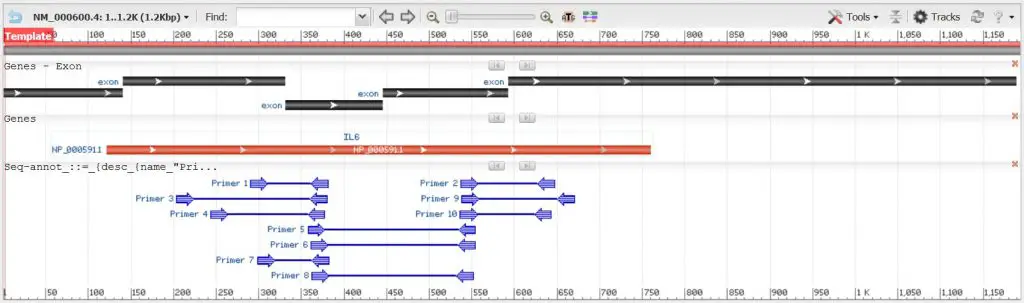
After running Primer-BLAST, the output window will be displayed. Hopefully, it has returned some potential primers for you.
The output can be split into two compartments: a graphical view of the primer pairs and a detailed primer report. In our example, we have 10 potential primer pairs based on the parameters we submitted to design primers for the IL-6 mRNA.
 8. Identifying the best primers

There are quite a few features a good primer pair should have for real-time PCR. Briefly, here is what you should look for:
- PCR product size: 70 – 200 base pairs.
- Primer length: 18 – 22 nucleotides (optimal: 20).
- GC% content: 50 – 60%. Primers should have similar GC%.
- Contain a GC clamp: A GC clamp is having either a G or a C base in the last 5 bases of the primer. Since G and C bases have a stronger binding affinity, this will ensure the 3’ end of the primer anneals correctly to the cDNA sequence.
- Tm: 59 – 65oC (optimal: 62oC). Primers should have similar Tm that are within 5oC of each other.
- Avoid nucleotide repeats: Avoid repeats of 4 or more adjacent repeats (e.g. GTTTT) and/or dinucleotide repeats (e.g. GCGCGCGC).
- Primers span exon-exon junction and/or primers are separated by a large intron: This is to prevent the amplification of genomic DNA.
- Select primers that bind near the 3’ end of the gene: This is particularly important if using oligo(dT)s during the first strand cDNA synthesis which bind to the polyA tail at the 3’ end of the gene. Some large genes may not amplify completely when using oligo(dT)s, therefore by having primers that bind to the 3’ end the efficiency should improve.
- Low self-complementarity score: Pick primers which have a low self-complementarity score, as given in the NCBI Primer-BLAST detailed primer report. Self-complementarity is the likelihood that the primer will bind to itself and to the other primer in the pair.
- Low self 3’-complementarity score: Pick primers which have a low self 3’-complementarity score, as given in the NCBI Primer-BLAST detailed primer report. Self 3’-complementarity is the likelihood that the primer will bind to itself and to the other primer in the pair at the 3’ end. High scores are a good predictor of primer dimer formation.
- Primers specific to your target: The advantage of using Primer-BLAST to design real-time PCR primers is that the software also BLASTs the primer sequence against the genome of the organism of interest. This means that the software will tell you if the primers are likely to bind elsewhere in the genome, which you obviously want to avoid. Make sure your primer pairs are specific for your intended target.
9. Which primer pair would I pick?
Based on our example of finding real-time PCR primers for the IL-6 mRNA in humans, I have 10 potential primer pairs to choose from. I will not go through each one individually as that would be quite boring. If you would like to know the exact results, then just use the aforementioned primer design parameters in Primer-BLAST to see what results I got.
Looking at the potential primer pairs, I decided on ‘primer pair 2’ as the one I would pick:
 Why? By using the list above, you can see that this pair ticks the majority of the features of a good real-time PCR primer pair:
- PCR product size: 110 base pairs.
- Primer length: 20 base pairs each.
- GC% content: 55% each.
- Contain a GC clamp: Both primers contain a GC clamp.
- Tm:55 – 62.10oC (within 1oC of each other).
- Avoid nucleotide repeats: No repeats in the primers.
- Primers span exon-exon junction and/or primers are separated by a large intron: The separating intron is 1745, which is fairly big.
- Select primers that bind near the 3’ end of the gene: Primers bind to exon 3 and 4 of the IL-6 cDNA which is near the 3’ end of the target.
- Low self-complementarity score: Scores are 6.00 and 5.00. These are quite high, but I have seen larger values work. Again, these are only theoretical values.
- Low self 3’-complementarity score: Scores are 1.00 and 0.00 therefore there should be a low chance of primer-dimer formation.
- Primers specific to your target: When looking underneath the primer results for primer pair 2, I can see that there is a list of ‘products on potentially unintended templates’. Here are some of them:
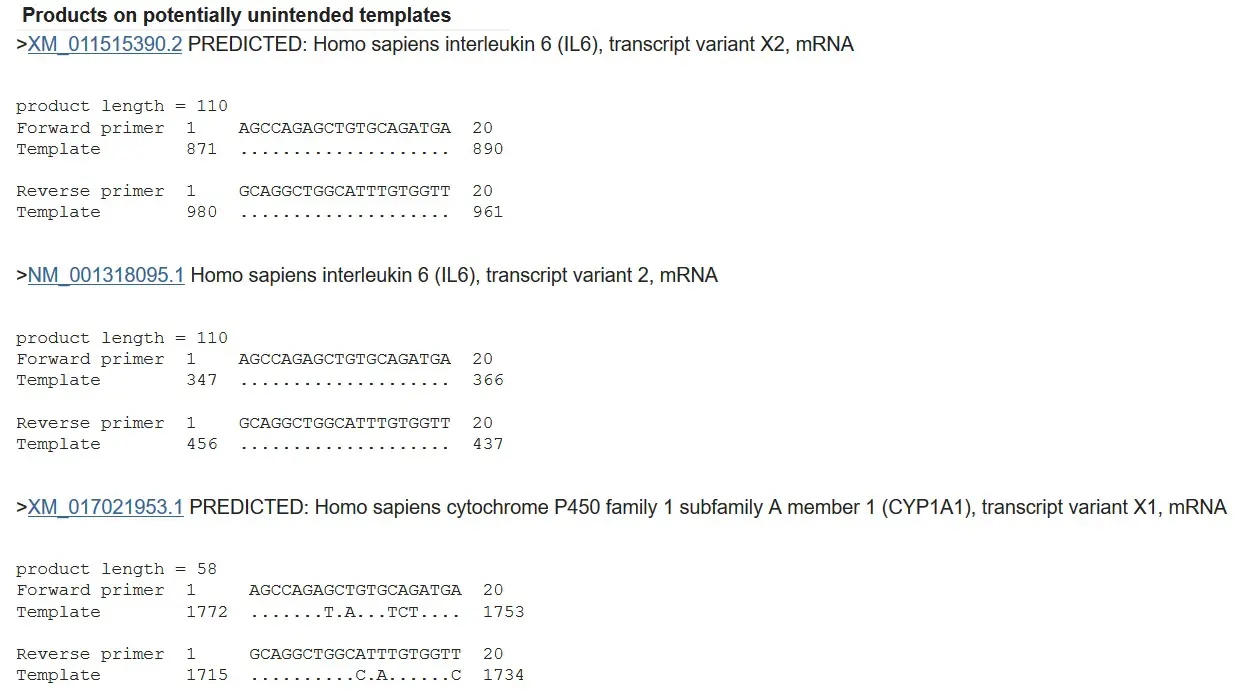 The first two are actually other transcript variants of IL-6, therefore this is fine for my theoretical purpose. If you are interested in a specific transcript variant of a gene, then obviously you will not want this.
Below this, there is another gene (CYP1A1) that may also amplify with these primers. Primer-BLAST states that the product size here would be 58 base pairs, which I should look for when running the product on an agarose gel.
Underneath this, the sequence of the potential binding is given. Where there is a dot (.) this indicates a complementary binding site, and where there is a base this refers to a difference in sequence between the primer and the template.
Hopefully by going through this how-to guide, you will now be able to design your own primers for real-time PCR by using NCBI’s Primer-BLAST. If the above settings do not work on your desired target, then go back and tweak some settings. You should also have an understanding of some of the features that make a good real-time PCR primer pair.


Great work Steven! I’ll be using your site quite often and I’ll definitely support the sight where possible!
thank u very much
Hi Steven,
Thank you very much for the information. I have designed some primers for the given DNA sequence. what is the best way to do blast search and how to analyse the Blast Data. for example; shall I do the blast for sequence first and then the Primer sequence or shall I do all together?
your help would be much appreciated.
looking forward to hear from you.
Best Regards
Jas
Hi Jas,
Thanks for your message.
So you are designing primers for DNA?
I usually use Primer-BLAST which does the BLAST at the same time as the primer design. If you want to design your programs using a different primer design software, simply take the primer sequences and put them in the BLAST program and pick your genome. After the BLAST has been performed, look at the ‘Ident’ column. This is a percentage score of how identical your primer sequence is to other parts of the genome.
I hope that makes sense.
Steven