RNA extraction using TRIzol is one of the most common molecular biology techniques used in the lab. Compared to spin column methods, it requires a great deal of skill and expertise to master. Below I have compiled 5 vital tips which I believe can make or break the extraction process. Try to incorporate these into your procedure to see if it can improve your technique, and ultimately give you super pure RNA. Of course, these tips are also suitable when using TRIzol analogs, such as TRIsure (Bioline) and QIAzol (Qiagen).
1. Ensure the correct volume of TRIzol is added
The primary step for the protocol requires the addition of TRIzol, or an equivalent solution, to lyse the cells/tissue sample. The volume of solution to add for the lysis will be dependent on the number of cells or the size of the tissue in question. Below is an example of adequate volumes of reagent to add for the corresponding cell/tissue sample size.
Cells
1 x 10² – 1 x 10⁶ (800 uL TRIzol)
1 x 10⁶ – 1 x 10⁷ (1 mL TRIzol)
Tissue
1 – 10 mg (800 uL TRIzol)
10 – 100 mg (1 mL TRIzol)
As a rule of thumb, the sample size should not be greater than 10% of the total volume of TRIzol used for lysis. If you are unsure whether to add 800 uL or 1 mL of lysis solution, always go for the 1 mL option. Using the correct volume of reagent for the lysis will ensure the RNA in the sample will be protected from degradation from RNases and the cells appropriately lysed.
2. Completely lyse the sample
To retrieve the highest possible yield and purity of RNA from the sample, it is essential that the sample is completely lysed before the addition of chloroform for the phase separation. This is relatively easy when lysing cells. Simply add the TRIzol reagent and either vortex or pipette up and down several times until you can no longer visibly see the cells in the sample.
For tissue, this is a little trickier depending upon the tissue type. The trick here is to ensure that you can no longer visibly see the tissue in the lysis solution. There are numerous techniques that you can use to allow for efficient tissue lysis, some are outlined below.
- Pipetting and vortexing: For softer tissues, it may be that pipetting and vortexing is adequate for lysis. I usually start with a P1000 pipette to break the tissue down. Once all the tissue can pass through a P1000 tip, go down to a P200 and repeat.
- Needle and syringe: For this approach, the tissue needs to be in small enough pieces to pass through the needle. Start off with the needle with a lumen large enough for the tissue to pass through (e.g. 19G), then use a smaller needle (e.g. 23G). Passing the tissue through the needle and syringe will cause it the shear.
- Dounce homogeniser: A Dounce homogeniser is a small glass tube and grinder set. It is very efficient for crushing tissues. However, make sure you clean the apparatus thoroughly in between samples.
- Pestle and mortar (with liquid nitrogen): Another popular lysis technique is the use of a pestle and mortar to grind frozen tissues down. By adding a little liquid nitrogen into the mortar with the tissue and using the pestle through circular motions will crush the tissue into a fine powder. The powder can then be transferred into a tube containing TRIzol.
- Tissue lyser machine: There are some excellent, but quite expensive, machines available to lyse the tissue for you. For example, Qiagen have their TissueLyser LT. Simply add a small ball bearing into an Eppendorf tube containing the tissue and TRIzol, place it into the machine and it will be shaken rapidly. The rapid shaking allows the ball bearing to homogenise the tissue completely in little time.
The decision to select a lysis technique will depend on equipment availability, cost, time and tissue type. I would suggest practising with different approaches to see what works best for your tissue of interest.
3. Make sure ‘shake vigorously’ means exactly that
After the addition of chloroform, it is advised to ensure the tubes are capped and shaken vigorously by hand for approximately 15 seconds. Obviously if the tubes are not capped, then this could get messy! The shaking is vital to allow for sufficient mixing of chloroform within the homogenates and thus allowing the complete dissociation of nucleoprotein complexes. In other words, this is to allow proteins to become extracted to the organic phase (bottom layer). Failing appropriate mixing at this stage can result in protein contamination in your sample, you don’t want that.
4. Go for quality over quantity when transferring the RNA supernatant
This is perhaps the most essential step of the RNA extraction procedure. Following centrifugation with chloroform, you should see three distinct layers to the sample. There is the bottom organic phase containing proteins and lipids, the delicate interphase containing the white strands of DNA and finally the RNA supernatant. The challenge here is to transfer as much supernatant as possible into a new tube, without disturbing the interphase. This is essentially a compromise between quality and quantity. Take the majority of the supernatant to gain the higher yields of RNA, but risk the likelihood of carrying over some DNA, or play it safe by leaving some supernatant behind resulting in slightly lower yields, but with super pure RNA.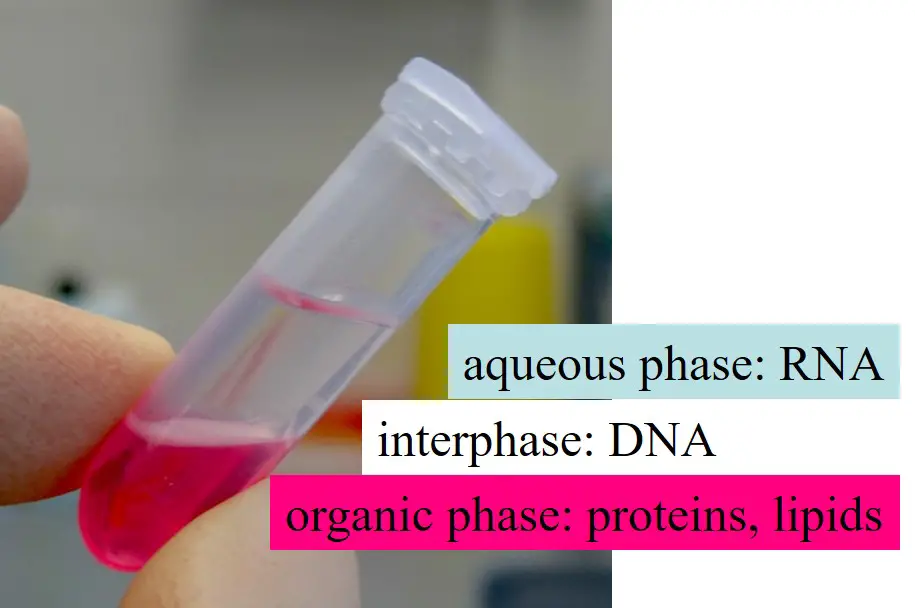 You should aim for quality over quantity ever time. Remember, it is likely that the RNA you are extracting is going to be used for future PCR reactions. A PCR requires minute amounts of starting material, so do not worry too much about the final yield! Focus on retrieving RNA that is free from protein and DNA carry over. When transferring the supernatant, I advise using a P200, not a P1000, as this will give you added control. Additionally, try and pipette at eye level so you can see exactly what you are taking off. Ensure the pipetting motion is very slow, otherwise the interphase will shoot up as well.
5. Remove as much ethanol as physically possible
After washing the RNA pellet with 70% ethanol to remove the excess salts, it is vital that all the ethanol is removed before redissolving RNA. Ethanol is the enemy when it comes to PCR since it can inhibit polymerases, thus impacting your results. I personally do not like the thought of heating the RNA to remove the ethanol, as is such the case for a few protocols. Therefore, here is my simple method for removing ethanol from the sample without heat.
- Remove as much ethanol as possible by using a P200 or a P1000 pipette. Be careful not to disturb the pellet.
- You will notice some residual ethanol still stuck on the sides of the Eppendorf tubes. To remove this, pulse-spin the tubes at 4oC to pull all of the leftover liquid to the bottom of the tube.
- Use a P10 pipette to remove the last bits of ethanol. The trick here is to place the pipette tip next to the pellet. If the pellet is in the way, you can use the pipette tip to move the pellet away from the liquid.
- Finally, briefly air-dry the pellet for 1-2 minutes. Since the majority of ethanol is removed by the pipette, the air drying process will be quicker. Make sure you do not over dry the pellet, however, since this will be harder to redissolve.
Featured and image credit: Jakob Suckale (via OpenWetWare)


Hello and thank you for this great and useful website.
I have a question about RNA extraction with TRIzol:
We are currently working on blood samples, and it is necessary for a good RNA extraction that thee samples are fresh.
what I want to know is if there is anyway that we could stop the RNA extraction (in any of the steps), freeze the sample and continue the extraction another day.
I ask this because of the working hour situation of our Lab.
Hi Mehrab
So storing blood is tricky due to the high concentration of RNaze enzymes in the samples. What you can do is add a preservative, such as RNA Later to your samples before storing (freezing) them. This will prevent any RNase enzymes from working. Or, you could collect the samples directly into PAXgene tubes, however, I know these can be quite expensive.
Check out this paper that looks at both of these methods.
I recommend RNA Later.
All the best,
Steven
Hi Dr Steven,
Thank you so much for this post it was really helpful. Do you think these values from brain punches would be good enough to do cDNA and a posteriori, qRT-PCR?
Sample 1:
concentration: 100.9 ng/ul
A260/280: 1.71
A 260/230: 0.65
Sample2:
concentration: 226.7 ng/ul
A260/280: 1.71
A 260/230: 0.52
Thank you!
Hello,
The purity values are a little low than I would expect for qPCR analysis. How are you extracting the samples?
Thanks,
Steven