In this tutorial, I’m going to show you how to perform a simple linear regression test in R.
How to perform a simple linear regression in R
For this tutorial I will use the trees dataset that is freely available within R, so you can follow along with this tutorial if you wish.
The trees dataset contains measures of girth, height and volume of 31 different cherry trees.
What I want to do is to perform a simple linear regression to see how well the measures of girth can predict the measures of volume of the trees.
If you’re interested in learning more about regression in R, then check out DataCamp’s interactive Correlation and Regression in R online course.
Step 1: Import your data into R
To be able to perform the linear regression, you first need some data containing the two variables of interest.
As mentioned above, I will be using the trees dataset.
To load the dataset into R, I will use the following code:
#Load the trees dataset
data(trees)
The trees data frame should now be visible in the environment.
Step 2: Perform the linear regression test in R
The great thing about performing a simple linear regression test in R is that there are no other packages required. You can simply use the lm function.
The code to run the linear regression is displayed below:
#Perform the linear regression
lm(Y ~ X, data = dataset)
Simply replace the following:
- Y – The Y (dependent) variable; this is the one you want to predict
- X – The X (independent) variable
- Dataset – The data frame (or list) containing the variables of interest
So, for my example, if I save the results to an object called results, I would use the following code:
#Perform the linear regression
results <- lm(Volume ~ Girth, data = trees)
Interpreting the results
To view the results of the linear regression test, simply use the summary function.
#View the results
summary(results)
The output for my example can be seen below.
Call:
lm(formula = Volume ~ Girth, data = trees)

Residuals:
   Min     1Q Median     3Q    Max
-8.065 -3.107  0.152  3.495  9.587

Coefficients:
            Estimate Std. Error t value Pr(>|t|)
(Intercept) -36.9435     3.3651  -10.98 7.62e-12 ***
Girth         5.0659     0.2474   20.48  < 2e-16 ***
---
Signif. codes:
0 ‘***’ 0.001 ‘**’ 0.01 ‘*’ 0.05 ‘.’ 0.1 ‘ ’ 1

Residual standard error: 4.252 on 29 degrees of freedom
Multiple R-squared:  0.9353,	Adjusted R-squared:  0.9331
F-statistic: 419.4 on 1 and 29 DF,  p-value: < 2.2e-16
I’ll now expand on the output of results.
Call
This is simply a repeat of the code entered into the regression test.
Residuals
A residual is simply the distance between the actual data point and the line of best fit.
The output reports the median, minimum, maximum, first quartile (1Q) and third quartile (3Q) of the residuals.
For a linear regression, it is assumed that the residuals are normally distributed. So, what you ideally want to see here is a median value close to zero. Also, you want to see that the first and third quartiles roughly reflect each other, and the minimum and maximum values roughly reflect each other.
It’s better to investigate the residuals further to assess normality, such as plotting the data on a histogram and a QQ plot.
Coefficients
In the first row, you will see the results for the Y intercept. This is the point where the regression line crosses the Y axis when the value of X = 0. So, for my example, this occurs when Y = -36.9435.
In the second row, you will find the slope coefficient value for the independent variable. In my example, this is Girth, which had a slope of 5.0659.
Using the intercept and slope values, it’s now possible to create a very simple linear model equation.

So, in this example, if we knew a tree’s girth, or diameter, we can predict the volume by replacing X with the girth value.
At the far right of the coefficients table you will see the P value for the intercept and the slope. To interpret these results, I’ll present my hypotheses:
- Null hypothesis – The intercept or slope coefficient value = 0
- Alternative hypothesis – The intercept or slope coefficient value ≠ 0
Usually, with an alpha of 0.05, we would reject the null hypothesis and accept the alternative hypothesis if P 0.05; the opposite would be true if P>0.05, so, we would fail to reject the null hypothesis.
Usually, when interpreting the coefficient results, it’s common to ignore the P value for the intercept and just look at the slope results. In this example, we can say that girth is a significant variable that impacts volume in this case.
Signif. codes
Moving on, under the coefficient table, we can see the significance (P value) codes.
These are just asterisks. Here we can see that 3 asterisks indicate a P value between 0 and 0.001
Residual standard error
The residual standard error is the average distance that the observed values fall from the regression line; the smaller the standard error, the more precise the linear regression model is.
Multiple R-squared
The multiple R-squared value tells you how much variance the dependent variable can be accounted for by the values of the independent variable. And, if we multiply this value by 100, we get a percentage value.
In this example, we can say that 93% of the variance in volume can be accounted for by the girth measures. The other 7% of the variance is therefore caused by other factors, such as measurements errors.
Adjusted R-squared
Nnext we have the adjusted multiple R-squared.
This value takes into account the number of independent variables in the regression analysis and corrects for bias. Usually, this value is only relevant when you are performing multiple linear regression, where there are more than one independent variables in the model.
F-statistic
On the bottom row, there is the results of F test.
The F statistic and the degrees of freedom are used to calculate the P value for the regression model.
For a simple linear regression model, this is like performing a Pearson correlation test on the two variables.
Here are the hypotheses for this test:
- Null hypothesis – There is no linear relationship between the girth and volume measures
- Alternative hypothesis – There is a linear relationship between the girth and volume measures
The P value for my example is a lot smaller than my alpha of 0.05, so I conclude that the linear regression model is significant; in other words, there is a significant linear correlation between the two variables.
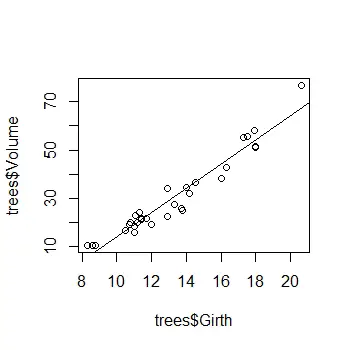
Plotting a scatter plot with a regression line in R
Before I finish, I’ll quickly show you how to add a regression line onto a scatter plot, which is probably something you’re wanting to do.
To plot a simple scatter plot, use the plot function.
#Create a scatter plot
plot(X, Y)
Simply replace the following:
- X – The X (independent) variable
- Y – The Y (dependent) variable
For my example, it will look like this:
plot(trees$Girth, trees$Volume)
Then, to add the regression line from the model, use the abline function and enter the object containing the results from the linear regression test. In this case, my results are saved in an object called results, so I will enter the following:
#Add the regression line
abline(results)
This will add the regression line onto the scatter plot.
Conclusion
So, now you know how to perform a simple linear regression test in R. Performing a linear regression test is super easy, you just use the lm function.
I’ve also shown you how to plot a basic scatter plot, along with the regression line.
R Studio version used: 1.2.5033
R version used: 3.6.3

