A table of contents is a useful feature to have in long documents, such as a thesis, to allow readers to quickly find what section they are looking for.
Creating a table of contents, however, can be a tricky task, especially when you have to keep on updating the page numbers.
But, did you know that there is a feature in Microsoft Word to automatically create one for you? No need to manually add and update page numbers, just let Word do the hard work for you.
In this guide, I’ll show you how to create a table of contents in Microsoft Word.
Understanding headings in Word
Before I can create a table of contents, I firstly need to add my headings. Word will then use these heading to populate the table of contents.
But, before I go ahead and add these, it’s important you understand the different heading structures, as this will affect how the headings appear within the table of contents.
You can think of heading structures like levels.
Any main headings of the piece of work or document are classed as Heading 1. Then any sub-headings under this will be Heading 2, and so and and so forth.
For example, if I was writing a thesis, I could have the following headings:
- Introduction (Heading 1)
- Methods (Heading 1)
- Methods 1 (Heading 2)
- Methods 2 (Heading 2)
- Methods 3 (Heading 2)
- Result (Heading 1)
- Discussion (Heading 1)
- Conclusion (Heading 1)
Now you understand about headings, let’s go and add some.
Adding headings in Word
To add headings in Word, simply add the heading text, highlight it and then go to the Home tab and select a heading (e.g. Heading 1) from the Styles box.
Notice how the appearance of the heading changes to fit with the style of the Heading 1 style.
If you want to edit the style so it looks differently, then simply right-click on Heading 1 in the styles box, and select Modify Style. This will open up a new window.
Here you can change the formatting such as the font, font size and color.
Go ahead and add all of the headings in the document, including any sub-headings.
Inserting the table of contents
The first thing you need to do is to click on the document where you would like the table of contents to be inserted. I have just selected the very top of the document.
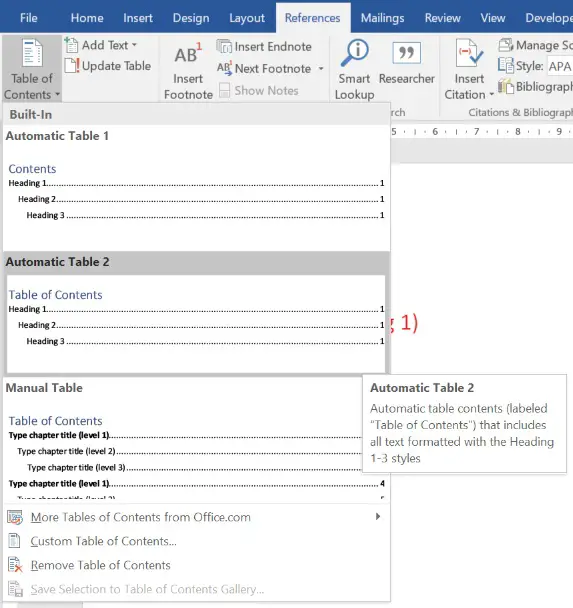
Next, go to the References tab and then find the Table of Contents button on the very left. By selecting this, you are given a few options.
- Automatic Table 1 – This is a type of table that will be populated based on the headings in the document
- Automatic Table 2 – Similar to the first option, but has some slight formatting differences
- Manual Table – You will need to manually populate this table with the headings and page numbers
For this example, I will select the Automatic Table 2.
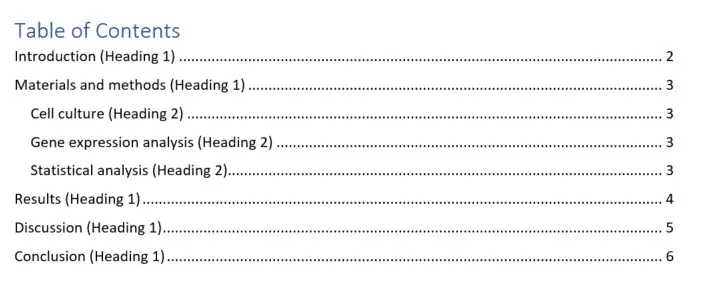
Word has inserted a table of contents with the corresponding titles and page numbers. Notice that the titles with the Heading 1 style are above the Heading 2 titles in the list. The page numbers are indicated on the right-hand side of the table.
 Keeping the table of contents updated
Despite being called an Automatic Table, this does not necessarily mean that every time you add a new heading it will be added to the table of contents. Additionally, if you move headings around, or add more pages, the changes will not be reflected in the table.
Whenever you make changes to the document, ensure you update the table of contents. To do this, click on the table of contents and an option will appear at the top of the table called Update Table. Click on this.
 A new window will appear with two options:
- Update page numbers only – As the name suggests, this will update only the page numbers for each section. This is useful when the heading titles have been unaltered and you want to ensure that the correct page numbers are assigned to each section.
- Update entire table – This option will update the page numbers and the titles for each heading. Obviously, if you edit a heading title within the document, you will need to select this option to reflect these changes in your table of contents.
Select an option which is appropriate to you and click on the OK button to update the table of contents.
Microsoft Word version used: 365 ProPlus


