In this extensive guide, I will explain how to perform pyrosequencing on Qiagen’s Q24 PyroMark Advanced system. To do this you need to have some PCR product you want to sequence which contains a biotinylated primer. For further information on designing CpG methylation assays using Qiagen’s PyroMark Assay Design software, see my previous guide.
This guide is also available as a condensed two-page protocol which is ideal for use in the lab.
Initial preparation
There is just a little initial preparation to do before you can start sequencing. By doing this, you will ensure the process runs smoothly and quicker.
1. Switch the PyroMark Q24 pyrosequencer on, by using the switch at the back of the machine, and also turn on a computer.
2. Turn a heat block on and set this to 80oC and place one of the Q24 plate holders on to heat up. I usually have to set my heat block to read 85oC for the actual plate on the top to reach approximately 80oC.
3. Use distilled water to prime the cartridge. To prime the cartridge, simply fill up the 6 wells completely with water and use your thumb to press down onto each segment. The pressure created should force water out of the cartridge. What you are looking for here is a water stream that is firing straight down. If the stream is not straight or the water is not coming out at all, the cartridge will most likely be blocked. Either clean the
4. Place the required solutions into the workstation tray:
Solutions
Fill the troughs with approximately 50 mL of the following solutions:
- 70% ethanol
- Denaturation Solution*
- Wash Buffer*
- Distilled water
- Distilled water
*These solutions are supplied by Qiagen. Alternatively, you could make your own, which is what I do. For the Denaturation Solution, I use 0.2 M NaOH and for the Wash Buffer 10 mM Tris-Acetate, pH 7.6.
5. Switch on the pump connected to the vacuum. It will take a few minutes to ensure the vacuum is created. After a few minutes have passed, test the vacuum is working by turning it on and sucking all of the water out of the tray in position ‘5‘.
6. Get the following reagents out of the fridge and freezer to reach room temperature:
Fridge
- Binding Buffer (supplied in the PyroMark Sequencing Reagents box)
- Annealing Buffer (supplied in the PyroMark Sequencing Reagents box)
- Sepharose beads
Freezer
- Substrate mixture* (supplied in the PyroMark Sequencing Reagents box)
- Enzyme mixture* (supplied in the PyroMark Sequencing Reagents box)
- Sequencing primer (100 µM stock)
- PCR samples to be sequenced
*When you first come to use the Substrate and Enzyme mixtures, you will have to redissolve the lyophilized powder in PCR-grade water.
Setting up the software
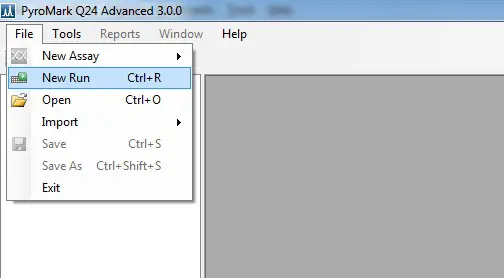
1. Log onto a computer and load up the PyroMark Q24 Advanced software. Go to ‘File > New Run‘ to start a new run.
 Here, enter the ‘Instrument Method‘ (you can find this number on the cartridge you are using) by using the drop-down menu.
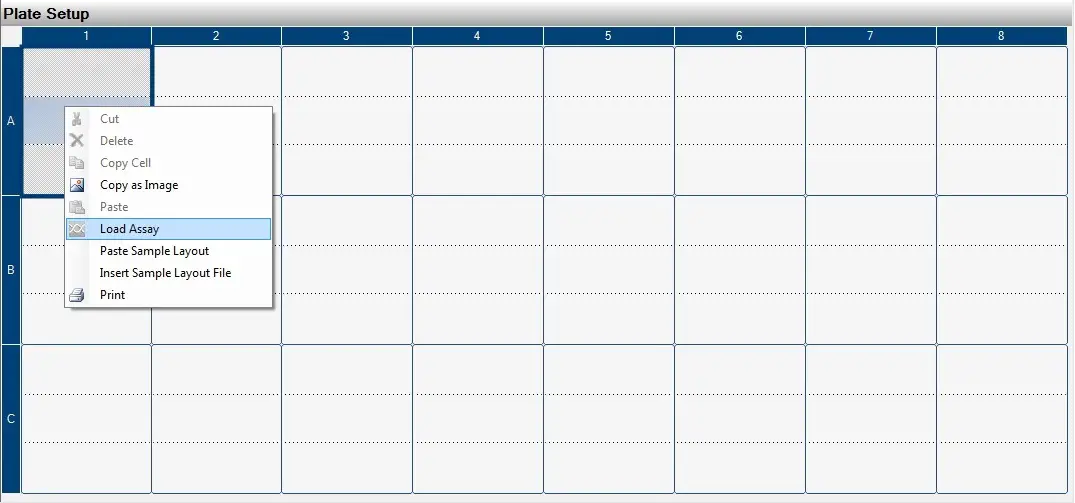
2. Load the assay onto the appropriate wells by right-clicking on the well and selecting ‘Load assay‘. Select the correct assay file.
 3. Enter additional information, if you so wish, such as sample names.
Sample preparation
1. Mix the Sepharose beads until they go into solution by inverting the bottle. DO NOT vortex the bottle to do this!
2. Create a master mix containing the Sepharose beads, Binding Buffer and PCR grade water in a 2 mL Eppendorf tube. For example, if you were to do a full plate of samples (24 samples), use the volumes in the table below. The extra 10% is added to account for pipetting errors.
| 1 reaction | 24 reactions (+ 10%) | |
| Sepharose beads | 1 µL | 26.4 µL |
| Binding Buffer | 40 µL | 1056 µL |
| PCR-grade water | 29 µL | 765.6 µL |
The following volumes are based on sequencing 10 µL of PCR product, so the total volume including the product will be 80 µL. If you are using more or less PCR product in the reaction, adjust the volume of PCR-grade water accordingly.
3. Get a 24-well PCR plate (I usually cut up these from a 96-well plate) and pipette 70 µL of this master mix (if sequencing 10 µL of PCR product) into each well.
4. Add 10 µL of the PCR sample to be sequencing into each well to create an 80 µL total volume. Put strip caps or a film on the top of the PCR plate when finished.
5. Place the PCR plate onto a plate shaker. I usually tape mine to the shaker itself. If your shaker has a heater option, ensure this is switched off. Shake the plate at 1400 RPM for 10 mins. Whilst this is shaking, continue to the next step.
6. Dilute the sequencing primer to 0.3 µM. To do this, add 2 µL of primer stock (at 100 µM concentration) to 648 µL of Annealing Buffer in a 2 mL Eppendorf tube. Vortex the tube to mix the solution.
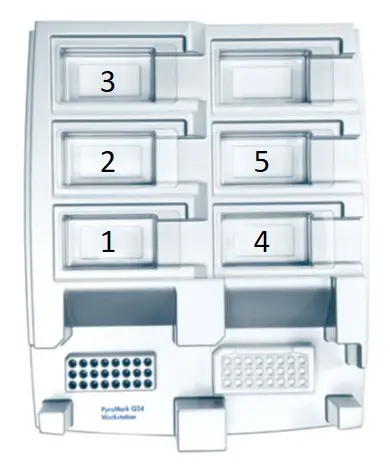
7. Add 25 µL of the newly diluted sequencing primer to each well of a PyroMark Q24 Plate. Place this plate into the appropriate slot on the workstation.
8. Once the 10 mins of shaking are up, take the samples off the shaker and place the plate onto the workstation. Remove the lid on the plate carefully. Turn on the handheld vacuum and process the samples.
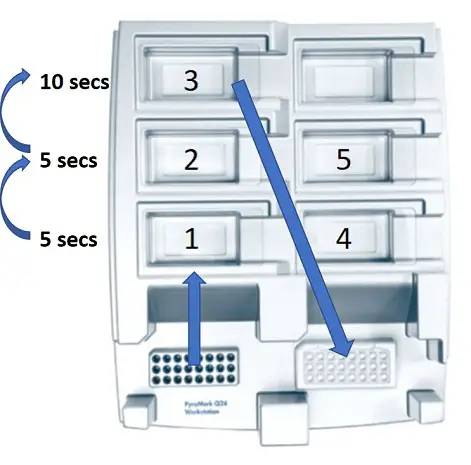
To do this, place the probes of the vacuum into the plate to pick up the samples. Keep this here for approximately 15 seconds, or until all of the liquid has been sucked up. Then, keep the vacuum switched on and horizontal, move the vacuum into the 70% ethanol tray (numbered 1 in the image below) for 5 seconds, then the Denaturation Buffer (numbered 2 in the image) for 5 seconds and then the Wash Buffer (numbered 3 in the image) for 10 seconds.
Now tilt the vacuum vertically for a few seconds to allow the excess Wash Buffer to pass through. The samples are now ready to be deposited onto the PyroMark Q24 Plate containing the diluted sequencing primer. Position the vacuum above the plate and then switch it off. Now place the probes into the PyroMark Q24 Plate. Shake the vacuum from side to side for a few seconds to deposit the beads onto the plate.
 To clean the vacuum, move it to the first tray containing the water (tray number 4). With the vacuum still switched off, shake it from side to side to remove any residual beads. Finally, move the vacuum to the second water tray (tray number 5) and switch the vacuum back on. Leave it on until all of the water has been sucked up. After this, you can turn the vacuum back off and place it in the empty parking position at the top of the workstation.
9. With the beads now on the PyroMark Q24 plate, move this onto the holder which is on the heater. Leave it to heat up for 2 minutes.
10. After 2 minutes, remove the plate and load it onto the PyroMark Q24 machine.
Loading the cartridge
The final step before you can begin the run is to load the sequencing reagents onto the cartridge. This is very easy to do.
1. Find out how much of each reagent to load into the cartridge by going back to the computer with the run file loaded up. On the software, go to ‘Tools > Pre Run Information‘.
 This will open a new window containing information on the volumes of each reagent to use. The volumes will vary depending upon the number of samples and the sequence of the run.
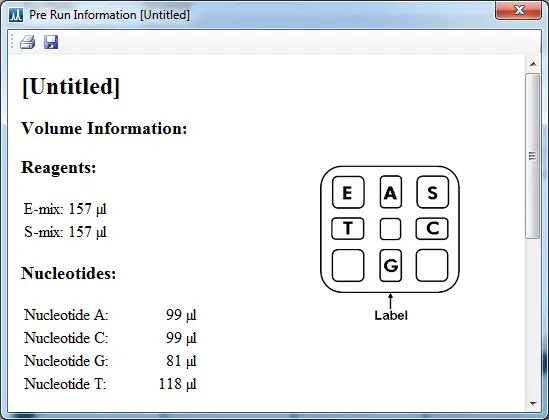 2. Carefully load the required reagents into the bottom of the appropriate wells. Try not to introduce any air bubbles. Use the map of the cartridge to help you determine the location of each well. Note that the sticker on the cartridge should be facing you when you load it to ensure the correct orientation.
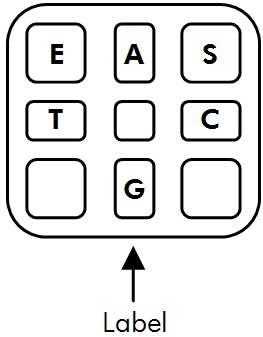
3. Load the cartridge into the PyroMark Q24 machine.
4. Save the run file onto a USB stick.
5. Insert the USB stick into the PyroMark Q24 machine. Wait for the machine to recognise the USB drive and select the correct run file to start the sequencing run.
The Q24 will now perform the sequencing which will take the time specified on the screen. Upon completion, remove and clean the cartridge using distilled water. To view the results, transfer the USB back into the computer and analyse the data using the PyroMark Advanced software.
Featured image credit: MIKI Yoshihito (via Flickr)


